Jira Integration
Automatically create Jira tickets for Ampliserv incidents to streamline your issue tracking workflow.
Overview
The Jira Integration allows Ampliserv to:
- Create Jira tickets automatically for incidents
- Sync status updates between Ampliserv and Jira
- Add comments from Ampliserv to Jira issues
- Link incidents to existing Jira tickets
- Track resolution across both platforms
Supported Jira Versions
🟢 Jira Cloud (Recommended)
- Atlassian Cloud instances
- API token authentication
- Real-time webhooks
🟡 Jira Server (Limited)
- On-premise Jira installations
- Basic auth or PAT tokens
- May require network configuration
🔴 Jira Data Center
- Contact support for setup
- Custom configuration required
Prerequisites
Before configuring Jira integration, you need:
1. Jira Account with:
- Administrator permissions
- Access to project where tickets will be created
- Ability to create API tokens
2. Jira Project with:
- Issue types configured (Bug, Task, etc.)
- Workflow permissions
- Custom fields (optional)
3. Network Access:
- Ampliserv must reach your Jira instance
- Firewall rules for API access
- SSL/TLS certificates (for HTTPS)
Step-by-Step Configuration
Step 1: Generate Jira API Token
-
Login to your Atlassian account:
- Go to https://id.atlassian.com/manage/api-tokens
- Login with your Jira administrator account
-
Create API token:
- Click "Create API token"
- Name: "Ampliserv Integration"
- Copy the token immediately (you won't see it again)
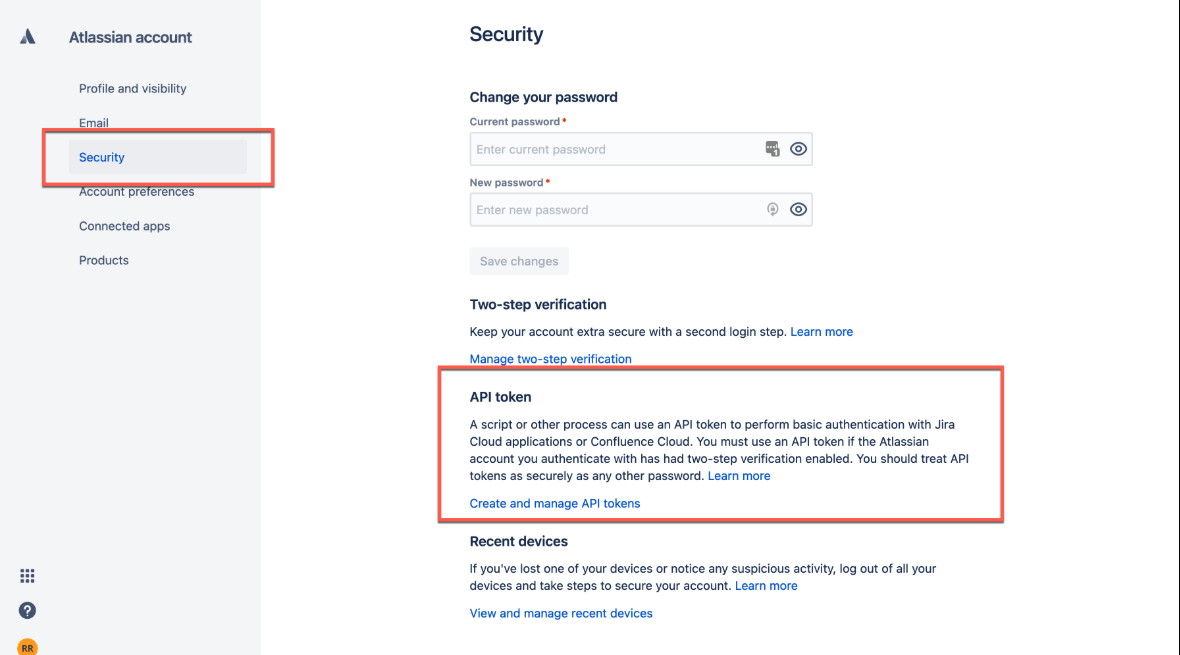
Figure 1: Finding Jira API token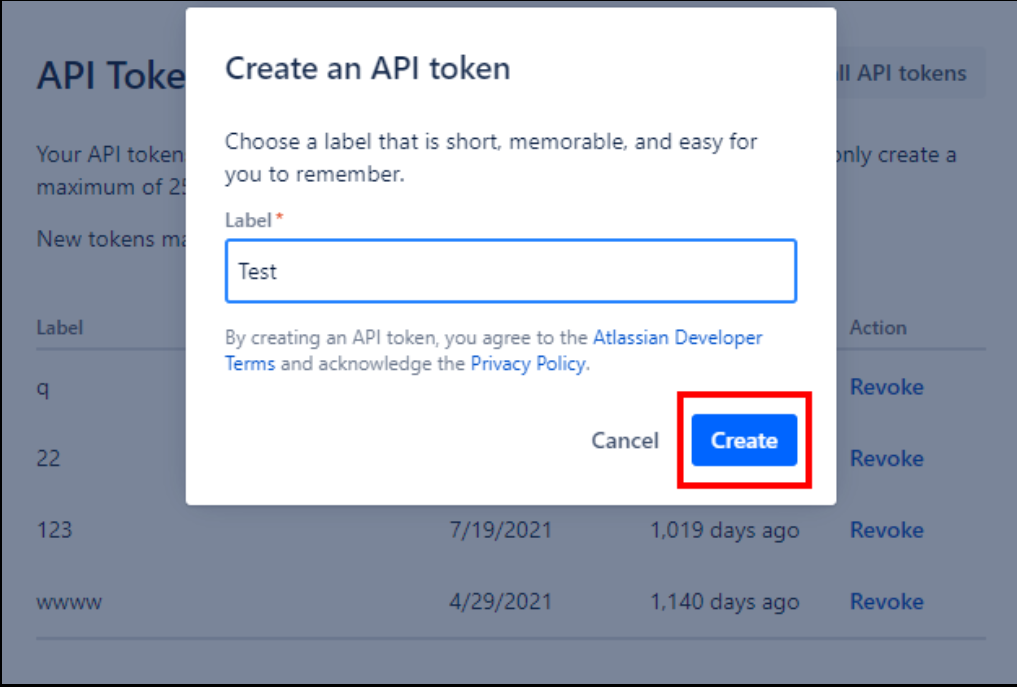 Figure 2: Give API token name to save
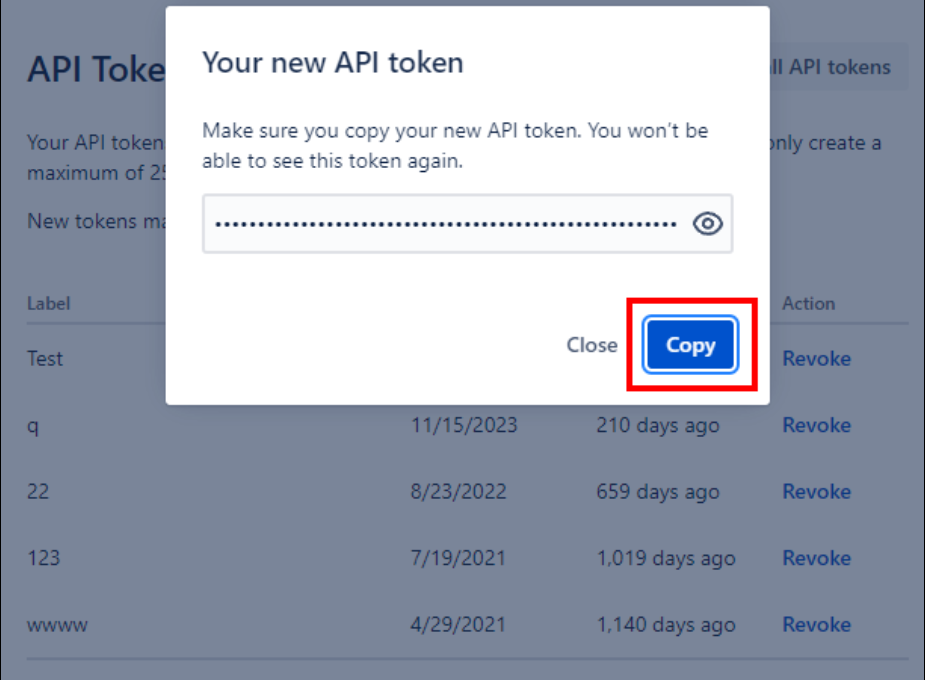 Figure 3: Copy API token to configure Jira
⚠️ Important: Save this token securely. You'll need it for configuration.
Step 2: Get Jira Domain
-
Find your Jira domain:
- Login to your Jira instance
- Look at the URL in your browser
- Format:
yourcompany.atlassian.net(Cloud) orjira.yourcompany.com(Server)
-
Examples:
- Cloud:
acme.atlassian.net - Server:
jira.acme.com
- Cloud:
Step 3: Find Project Key
- Navigate to your project in Jira
- Look at issue URLs or project settings
- Format: 2-10 uppercase letters (e.g.,
PROJ,DEV,SUPPORT)
To find project key:
- Click on the three dots(...) in your project name in your jira board's left sidebar
- Look for "Space Settings" and click on it
- Look for "Space key" field in Space Settings → Details
- Or create a test issue and check its key format:
PROJ-1
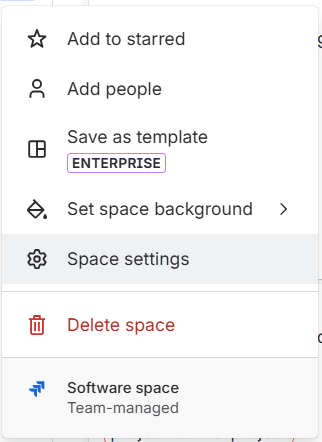
Figure 4: Select space settings in the appeared after clicking three dots in project name
 Figure 5: Look for space key which is actually the project key
Step 4: Get Username/Email
- Jira Cloud: Use the email associated with your Atlassian account
- Jira Server: Use username or email (depending on configuration)
Format:
- Email:
user@company.com - Username:
jirauser(for Server)
Configuration in Ampliserv
Step 1: Access Jira Integration
- Login to Ampliserv dashboard
- Navigate to Integrations → Jira
- Click "Configure" button
Step 2: Fill Configuration Fields
Enter the following information:
| Field | Description | Example |
|---|---|---|
| Jira Domain | Your Jira instance URL | acme.atlassian.net |
| Username | Your Jira login email | admin@acme.com |
| API Token | Token from Step 1 | ATATT3xFfGF0... |
| Project Key | Jira project identifier | PROJ |
| Issue Type | Default issue type | Task(Check by collapsing out the work type section in settings) |
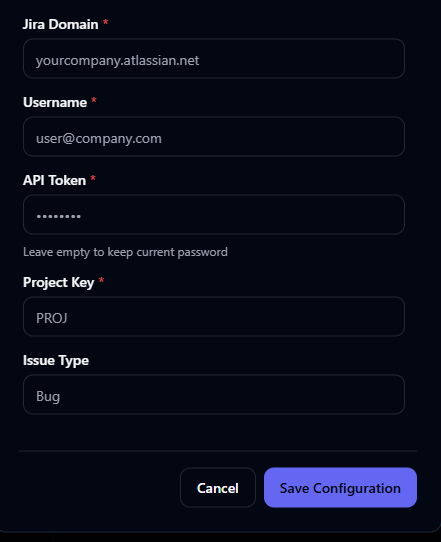
Figure 4: Jira configuration form
Step 3: Save and Verify
- Click "Save Configuration"
- Wait for connection test (auto-verification)
- Status changes to "Connected" (green checkmark)
- Test with a sample incident
Field Descriptions
Required Fields
1. Jira Domain
- Purpose: Where your Jira instance is hosted
- Format:
- Cloud:
[company].atlassian.net - Server:
jira.[company].com
- Cloud:
- How to find: Look at your Jira URL
- Validation: Must be accessible from the internet
2. Username/Email
- Purpose: Authentication identity
- Cloud: Email address (
user@company.com) - Server: Username or email (depends on setup)
- Permissions: Must have create issue rights in target project
3. API Token
- Purpose: Secure authentication without password
- Length: ~200 characters
- Security: Treat like a password
- Regeneration: Every 90 days recommended
4. Project Key
- Purpose: Which Jira project to create tickets in
- Format: 2-10 uppercase letters
- Examples:
DEV,PROD,SUP,IT - Validation: User must have access to project
5. Issue Type
- Purpose: Default issue type for new tickets
- Common values:
Bug,Task,Story,Incident - Default:
Bug - Note: Must exist in space settings --> work types
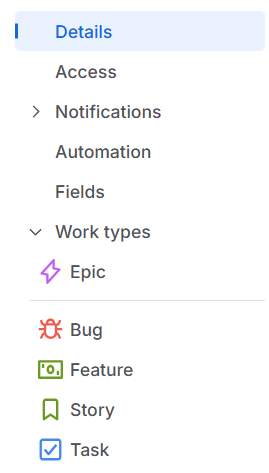 Figure 7: Look for issue type after EPIC field (here the issue types are Bug, Task etc.)